





Tik Tok Tik Tok …
최종 프로젝트 사전 준비
Search
Rest-api를 활용한 블로그 구현
기능 구현
•
React
•
SpringBoot

2024. 9. 3 (rest-api)
실습
1.
Favorite 엔티티 생성
2.
Repository 생성
3.
Service 생성
4.
FavoriteController 생성
•
엔티티 생성
2024. 9. 4 (rest-api)
rest-api 관련 실습 진행 (blog 예제)
•
react
•
springboot - 회원가입 인증 관련 내용 진행
2024. 9. 5 (rest-api)
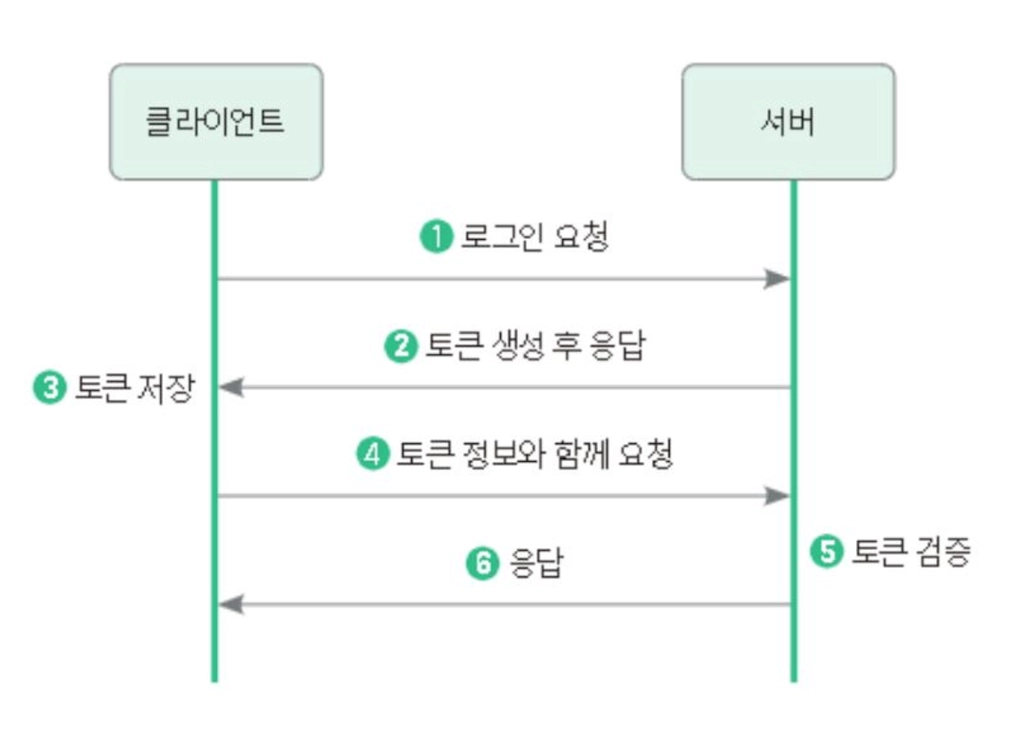

2024. 9. 9 (JWT 토큰)
Spring 코드
LoginCustomAuthenticationFilter 작성
•
로그인 인증 필터를 위해 LoginCustomAuthenticationFilter 작성
(WebSecurityConfig 쪽에서 로그인 필터 내용 제거해도 됨)
package com.kosta.config;
import com.fasterxml.jackson.databind.ObjectMapper;
import com.kosta.domain.LoginRequest;
import jakarta.servlet.FilterChain;
import jakarta.servlet.ServletException;
import jakarta.servlet.http.HttpServletRequest;
import jakarta.servlet.http.HttpServletResponse;
import lombok.extern.slf4j.Slf4j;
import org.springframework.security.authentication.AuthenticationManager;
import org.springframework.security.authentication.UsernamePasswordAuthenticationToken;
import org.springframework.security.core.Authentication;
import org.springframework.security.core.AuthenticationException;
import org.springframework.security.web.authentication.AbstractAuthenticationProcessingFilter;
import org.springframework.security.web.util.matcher.AntPathRequestMatcher;
import java.io.IOException;
@Slf4j
public class LoginCustomAuthenticationFilter extends AbstractAuthenticationProcessingFilter {
private static final AntPathRequestMatcher LOGIN_PATH = new AntPathRequestMatcher("/api/auth/login", "POST");
protected LoginCustomAuthenticationFilter(AuthenticationManager authenticationManager) {
super(LOGIN_PATH);
setAuthenticationManager(authenticationManager);
}
@Override
public Authentication attemptAuthentication(
HttpServletRequest request, HttpServletResponse response) throws AuthenticationException,
IOException, ServletException {
// POST, /api/auth/login 에 요청이 들어오면 진행되는 곳
LoginRequest loginRequest = null;
// 1. Body에 있는 로그인 정보 ("email": "~~", password: "~~")
try {
log.info("[attemptAuthentication] 로그인 정보 가져오기");
ObjectMapper objectMapper = new ObjectMapper();
loginRequest = objectMapper.readValue(request.getInputStream(), LoginRequest.class);
} catch (IOException e) {
throw new RuntimeException("로그인 요청 파라미터 이름 확인 필요 (로그인 불가)");
}
// 2. email과 password를 기반으로 AuthenticationToken 생성!
log.info("[attemptAuthentication] AuthenticationToken 생성");
UsernamePasswordAuthenticationToken uPAT = new UsernamePasswordAuthenticationToken(
loginRequest.getEmail(), loginRequest.getPassword());
// 3. 인증 시작 (AuthenticationManager의 authenticate 메소드가 동작할 때 -> loadUserByUsername 동작)
log.info("[attemptAuthentication] 인증 시작");
Authentication authenticate = getAuthenticationManager().authenticate(uPAT);
return authenticate;
}
@Override
protected void successfulAuthentication(HttpServletRequest request, HttpServletResponse response,
FilterChain chain, Authentication authResult)
throws IOException, ServletException {
log.info("로그인 정상적으로 성공함");
super.successfulAuthentication(request, response, chain, authResult);
}
}
2024. 9. 10 (JWT 토큰)
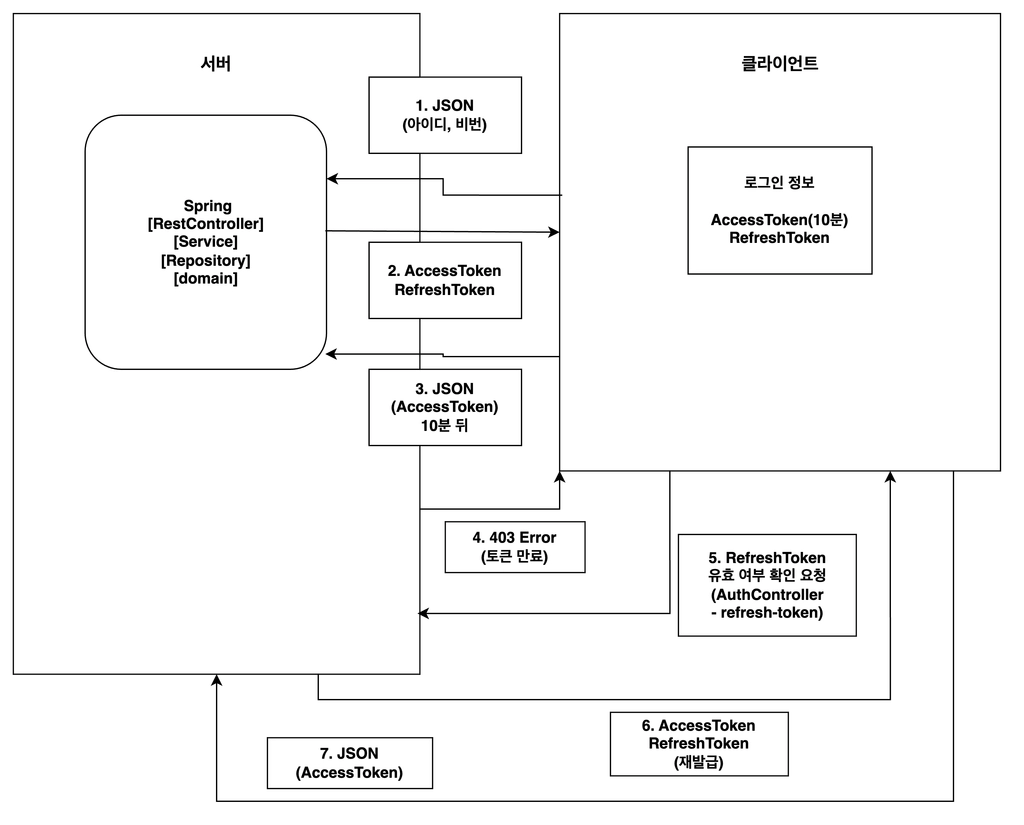
2024. 9. 11 (JWT 토큰)
•
SQL(Structured Query Language)
•
RDBMS(관계형 데이터베이스)
: MySQL, OracleDB, MSSQL, MariaDB, PostgreSQL, DB2
•
RDBMS 특징
•
SQL에서 테이블의 모든 데이터를 조회하기
2024. 9. 12 (SQL)
Springboot (패키지별로 정리)
•
config
•
controller
•
domain
•
entity

2024. 9. 13 (JWT 실습)
REST TEMPLATE
•
Spring Framework 에서 HTTP 요청을 보내는 클래스
•
해당 페이지 접속
•
Spring 5.0 → WebClient 를 사용할 것을 권장

2024. 9. 19 (REST TEMPLATE, OAuth)
SpringBoot
•
oAuth 계정 생성
// oAuth 계정 생성
private User generateOAuthUser(String accessToken, String provider) {
// 설정 가져오기
OAuth2Properties.Client client = oAuth2Properties.getClients().get(provider);
HttpHeaders headers = new HttpHeaders();
headers.add("Authorization", "Bearer " + accessToken);
RestTemplate rt = new RestTemplate();
// 구글에 저장된 정보
ResponseEntity<JsonNode> responseEntity = rt.exchange(client.getUserInfoRequestUri(),
HttpMethod.GET, new HttpEntity<>(headers), JsonNode.class);
// response 상태에 따라 구분
if (!responseEntity.getStatusCode().is2xxSuccessful() || responseEntity.getBody() == null) {
throw new ResponseStatusException(HttpStatus.NOT_FOUND, "사용자 정보를 가져올 수 없음");
}
JsonNode jsonNode = responseEntity.getBody();
System.out.println(jsonNode);
String email = null;
String name = null;
User user = null;
try {
if (jsonNode.has("response")) { // 네이버
email = jsonNode.get("response").get("email").asText();
name = jsonNode.get("response").get("name").asText();
} else if (jsonNode.has("email") && jsonNode.has("name")) { // 구글, Github
email = jsonNode.get("email").asText();
name = jsonNode.get("name").asText();
} else if (jsonNode.has("id") && jsonNode.has("properties")) { // 카카오
email = jsonNode.get("id").asText() + "@kakao.com";
name = jsonNode.get("properties").get("nickname").asText();
}
user = User.builder()
.email(email)
.name(name)
.build();
} catch (RuntimeException e) {
throw new RuntimeException("해당 사용자를 찾을 수 없습니다.");
}
return user;
}
React
2024. 9. 20 (oAuth 실습)
2024. 9. 24 (Docker)

2024. 9. 25 (Docker, CI/CD)
front(폴더)
nginx.conf 생성
server {
listen 80;
server_name localhost;
root /usr/share/nginx/html;
index index.html;
location / {
try_files $uri $uri/ /index.html;
}
location /api/ {
proxy_pass http://1.2.3.4:8080;
}
}
Dockerfile 생성
## React 프로젝트 배포 절차 ##
# 1. node 이미지
FROM node:20 AS build
# 2. 컨테이너에 작업 디렉토리 설정
WORKDIR /app
# 3. package.json & package-lock.json을 작업 디렉토리에 복사 (와일드카드 적용 : *)
COPY package*.json ./
# 4. 의존성 업데이트 및 설치
RUN npm update
RUN npm install
# 5. 소스 코드를 컨테이너에 복사
COPY . .
# 6. React 애플리케이션 빌드
RUN npm run build
# 배포
# 1. nginx 이미지
FROM nginx:alpine
# 2. nginx 설정 파일을 교체
COPY nginx.conf /etc/nginx/conf.d/default.conf
# 3. nginx 기본 html 삭제
RUN rm -rf /usr/share/nginx/html/*
# 4. 빌드된 React 애플리케이션을 nginx 디렉토리로 복사
COPY --from=build /app/build /usr/share/nginx/html
# 5. nginx 포트 노출
EXPOSE 80
# 6. nginx 서버 실행
CMD [ "nginx", "-g", "daemon off;" ]
VM에서 git pull 이후에 docker run
2024. 9. 26 (Docker, CI/CD)
Docker 실습 (rest_product 프로젝트 배포)
기존에 설치되어 있는 Docker Container, Docker image 삭제
hms@ubuntu:~/2024-kosta-project/back$ docker stop front-container back-container mysql-container
front-container
back-container
mysql-container
hms@ubuntu:~/2024-kosta-project/back$ docker rm front-container back-container mysql-container
front-container
back-container
mysql-container
hms@ubuntu:~/2024-kosta-project/back$ docker ps -a
CONTAINER ID IMAGE COMMAND CREATED STATUS PORTS NAMES
660c94f1e4d3 f05d9449e619 "/bin/sh -c './gradl…" 4 hours ago Exited (126) 4 hours ago charming_williamson
hms@ubuntu:~/2024-kosta-project/back$ docker rm 660c
660c
hms@ubuntu:~/2024-kosta-project/back$ docker images
REPOSITORY TAG IMAGE ID CREATED SIZE
back-image latest f95d8a9d5226 23 minutes ago 377MB
<none> <none> 01f78139c4ef 23 minutes ago 660MB
<none> <none> a6543a52708b 3 hours ago 660MB
<none> <none> 894ff6326204 3 hours ago 377MB
<none> <none> 3af1ab7b093f 3 hours ago 660MB
<none> <none> 0c16c8268714 4 hours ago 660MB
<none> <none> f05d9449e619 4 hours ago 608MB
front-image latest 87ed939d1f53 4 hours ago 50.2MB
<none> <none> e2102b88367b 4 hours ago 1.97GB
gradle 8-jdk17-alpine b3c54050e08c 2 weeks ago 555MB
node 20 dd223fd5024d 5 weeks ago 1.1GB
nginx alpine c7b4f26a7d93 6 weeks ago 43.2MB
mysql 8 f742bd39cd6b 2 months ago 584MB
openjdk 17-jdk-alpine 264c9bdce361 3 years ago 326MB
hms@ubuntu:~/2024-kosta-project/back$ docker network rm kosta-net
kosta-net
# 이미지 전체 삭제인 경우 $(docker images -q) 명령어를 활용
hms@ubuntu:~/2024-kosta-project/back$ docker rmi $(docker images -q)
Front
•
Dockerfile
# 1. node 이미지
FROM node:20 AS build
# 2. 컨테이너에 작업 디렉토리 설정
WORKDIR /app
# 3. package.json & package-lock.json을 작업 디렉토리에 복사 (와일드카드 적용 : *)
COPY package*.json ./
# 4. 의존성 업데이트 및 설치
RUN npm update
RUN npm install
# 5. 소스 코드를 컨테이너에 복사
COPY . .
# 6. React 애플리케이션 빌드
RUN npm run build
# 배포
# 1. nginx 이미지
FROM nginx:alpine
# 2. nginx 설정 파일을 교체
COPY nginx.conf /etc/nginx/conf.d/default.conf
# 3. nginx 기본 html 삭제
RUN rm -rf /usr/share/nginx/html/*
# 4. 빌드된 React 애플리케이션을 nginx 디렉토리로 복사
COPY --from=build /app/build /usr/share/nginx/html
# 5. nginx 포트 노출
EXPOSE 80
# 6. nginx 서버 실행
CMD [ "nginx", "-g", "daemon off;" ]
•
docker-compose.yml
2024. 9. 27 (Docker, CI/CD)
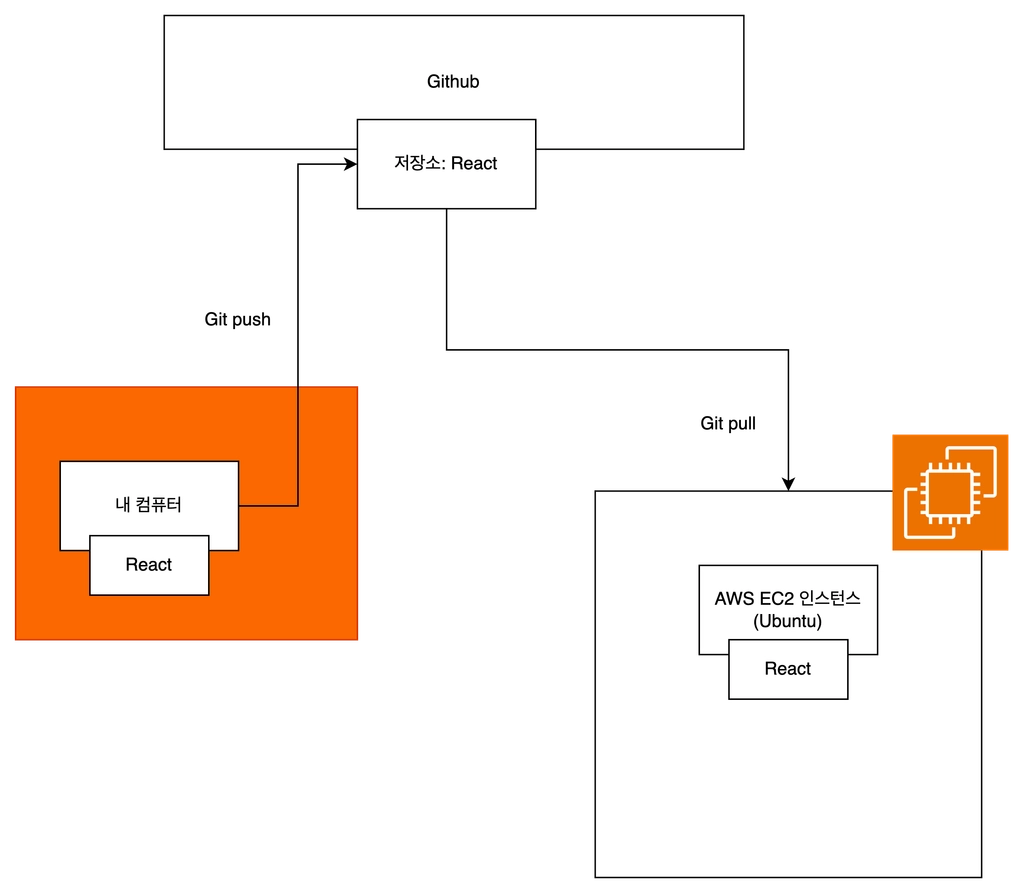
2024. 9. 30 (Github Action)
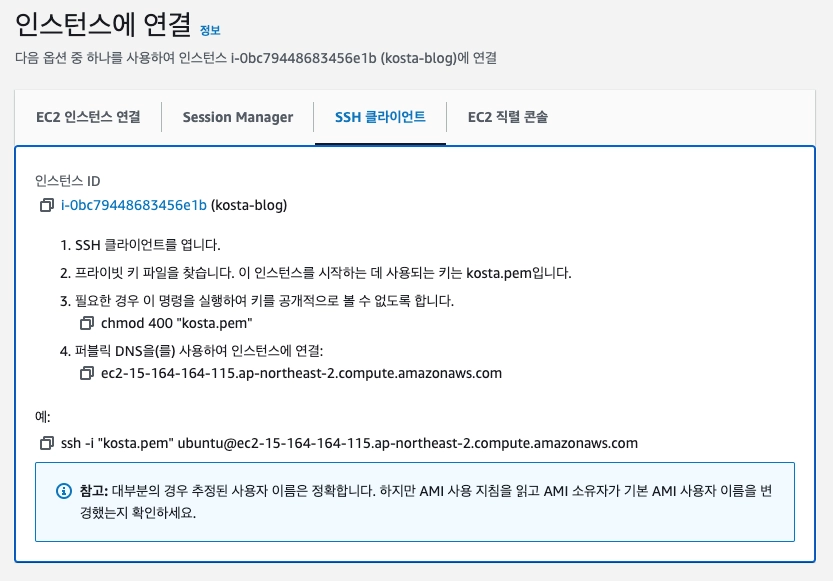

2024. 9. 30 Docker-Github Action 실습 복기